Contents
Creating resin coasters for your home is a fun and rewarding craft. This is a perfect way to add a personal touch to your home décor while making something practical. These items beautify your space while protecting your wood furniture from water rings, tea stains, or those pesky condensation marks left by cans. Plus, the process is incredibly therapeutic and satisfying, making it a wonderful form of self-care. By the end, you’ll have unique coasters that elevate your space and protect your surfaces.
Gather Materials
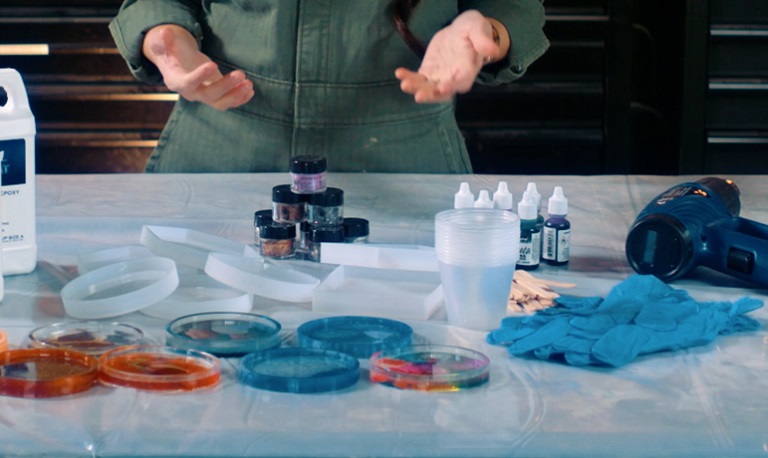
The first thing you’ll want to do when starting your project is to pick out the right materials, and the star of the show is the epoxy. So, what resin is best for coasters? If you’re aiming for that crystal-clear finish, clear epoxy resin for creative crafts is your best bet. It’s super popular because it gives that sleek, glossy look, and it’s durable, which is perfect for something that will be getting a lot of use like a coaster.
This material is self-levelling, so you won’t have to worry about uneven surfaces. It helps achieve that smooth, flawless finish, and it’s a great base to show off any designs or little treasures you want to incorporate. Once you’ve got your epoxy resin ready, you’ll also need silicone moulds to shape your coasters. They come in all sorts of cool designs. If you want to add a personal touch, you can get creative with what you embed inside.
You’ll also need some mixing cups, stir sticks and a good pair of latex gloves to keep things clean. It’s a good idea to have a drop cloth down just in case of any spills, and a butane lighter will help you get rid of any pesky bubbles that might pop up. Once you’re ready to let your coasters cure, dust covers like parchment paper work great to keep everything safe. And don’t forget the clear bumpers to keep your finished coasters scratch-free when they’re ready to use.
Prepare and Mix the First Coat
Before you dive in, make sure you’re working in a well-ventilated space and cover your surface with a drop cloth or mat to catch any spills. Slip on your gloves, and don’t forget to grab a container for any trash. Have the instructions on hand for reference as you go through each step. When it comes to mixing the first layer, you don’t need much – just enough to hold your decorations in place. Make sure to combine equal parts of the clear mixture and hardener. This 1:1 ratio is essential to get the perfect consistency and a durable finish. Around 60ml of each works well for four coasters.
Add Decorations
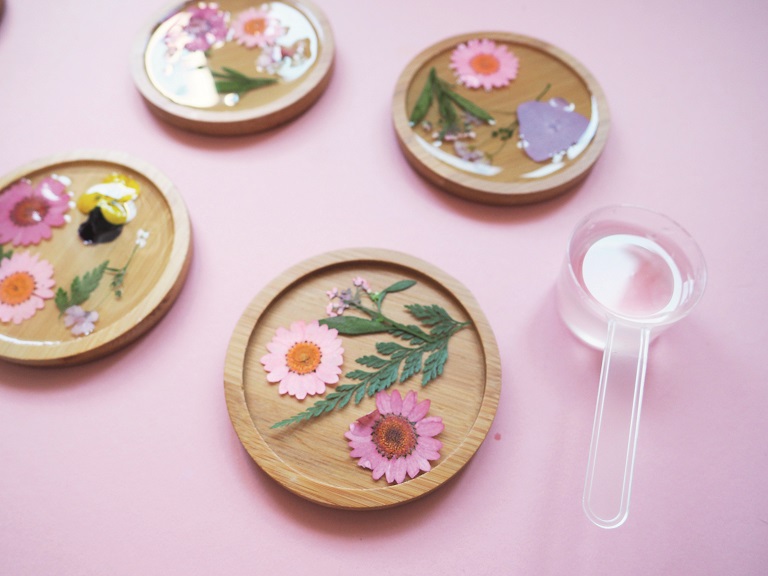
Once you’ve mixed your clear epoxy resin and are ready to go, pour a small amount into each mould and start arranging your chosen decorations. This is where you can get creative – consider your home’s style to add flair to your space and make your coasters stand out. Whether you go for faux greenery, vibrant flowers or even small personal trinkets, this is the perfect time to make your coasters reflect your style. Let your creativity guide you as you arrange everything, and don’t be afraid to experiment with different elements.
Consider placing the decorations upside down, so they would be right-side up once flipped over later. At this point, you probably won’t see too many bubbles, but if you do, a quick pass with a butane lighter will take care of them – just make sure to keep a bit of distance between the flame and the surface. Afterward, cover the moulds to protect them from dust and let them sit for about four hours to let the first layer cure.
Apply the Top Coat
For the final coat of epoxy resin, you’ll need to mix up a bit more of the clear mixture, but the process stays the same as before. If your measuring cups aren’t large enough, you can pour the contents into a bigger disposable cup to make sure you have enough for each mould. For this stage, you can use about 180ml of each part. After mixing, carefully pour the mixture into each mould, making sure to spread it evenly. While the material is self-levelling, give the moulds a gentle shake to ensure the surface is smooth and even all across.
Pop Bubbles
At this point, you’ll likely notice plenty of bubbles on the surface, which is normal. Consider waiting for about five minutes so the bubbles could naturally rise, but be careful not to wait too long – around 15 minutes should be your max, or else the mixture will start setting. Popping those bubbles is one of the most fun parts of the whole process. There’s something oddly satisfying about watching them disappear with a quick pass of a lighter. Just make sure to keep the flame at least 15cm above the surface and move it around gently.
Leave the Coasters to Cure
Once you’re happy with how everything looks, cover the coasters with a dust cover and leave them to cure for at least 24 hours. It’s best to leave them undisturbed to avoid any accidental fingerprints. After about 36 hours, they should be ready to pop out of the mould. To finish them off, add some bumpers to the bottom to make them more stable and ensure that the coasters don’t slide around easily.
Now that your coasters are complete, it’s time to sit back and admire your handiwork. These unique pieces don’t just protect your surfaces, they also add a personal touch to your home décor. Whether you’re entertaining guests or enjoying a cup of coffee alone, your new pieces will steal the spotlight. Guests will be impressed by your creativity, and you’ll have some beautiful conversation starters to share. Plus, each coaster tells the story of your crafting journey, making them even more special.
